A simple VPN (tunnel with tun device) demo and some basic concepts
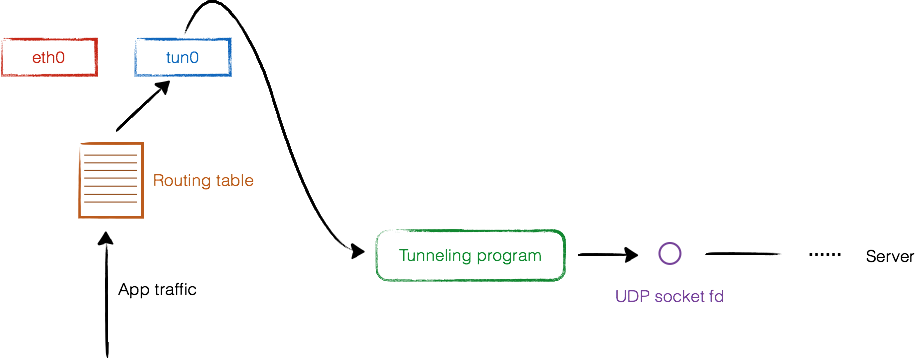
As you may already know, VPN stands for Virtual Private Network, namely it is a private network, with many components being virtualized. From a user’s perspective, all we need is a virtual network interface (e.g. /dev/tun0) on my device and configure my routing table to route all or part of traffic going through that interface, but what happens then? This post provides a demo revealing some implementation details after the virtual network interface - tunneling, the code is here.
In a nutshell, the process for client side tunneling is:
- Open an UDP socket whose other side is the server.
- Create the
tundevice, configure it and bring it up. - Configure routing table.
- Read packets from
tundevice, encrypt, send to server via socket created in 1st step; And read from the socket, decrypt, write back totundevice. This step goes on and on.

The following code snippet creates the UDP socket, which is basic UNIX network programming.
int udp_bind(struct sockaddr *addr, socklen_t* addrlen) {
  struct addrinfo hints;
  struct addrinfo *result;
  int sock, flags;

  memset(&hints, 0, sizeof(hints));
  hints.ai_socktype = SOCK_DGRAM;
  hints.ai_protocol = IPPROTO_UDP;

  const char *host = SERVER_HOST;

  if (0 != getaddrinfo(host, NULL, &hints, &result)) {
    perror("getaddrinfo error");
    return -1;
  }

  if (result->ai_family == AF_INET)
    ((struct sockaddr_in *)result->ai_addr)->sin_port = htons(PORT);
  else if (result->ai_family == AF_INET6)
    ((struct sockaddr_in6 *)result->ai_addr)->sin6_port = htons(PORT);

  memcpy(addr, result->ai_addr, result->ai_addrlen);
  *addrlen = result->ai_addrlen;

  if (-1 == (sock = socket(result->ai_family, SOCK_DGRAM, IPPROTO_UDP))) {
    perror("Cannot create socket");
    freeaddrinfo(result);
    return -1;
  }

  if (0 != bind(sock, result->ai_addr, result->ai_addrlen)) {
    perror("Cannot bind");
    close(sock);
    freeaddrinfo(result);
    return -1;
  }

  freeaddrinfo(result);

  flags = fcntl(sock, F_GETFL, 0);
  if (flags != -1) {
    if (-1 != fcntl(sock, F_SETFL, flags | O_NONBLOCK))
      return sock;
  }
  perror("fcntl error");

  close(sock);
  return -1;
}
The following code “clone” a new virtual interface named “tun0” from “/dev/net/tun”. IFF_TUN illustrates this virtual interface works on network layer while IFF_TAP will make the interface work on data link layer.
int tun_alloc() {
  struct ifreq ifr;
  int fd, e;

  if ((fd = open("/dev/net/tun", O_RDWR)) < 0) {
    perror("Cannot open /dev/net/tun");
    return fd;
  }

  memset(&ifr, 0, sizeof(ifr));

  ifr.ifr_flags = IFF_TUN | IFF_NO_PI;
  strncpy(ifr.ifr_name, "tun0", IFNAMSIZ);

  if ((e = ioctl(fd, TUNSETIFF, (void *) &ifr)) < 0) {
    perror("ioctl[TUNSETIFF]");
    close(fd);
    return e;
  }

  return fd;
}
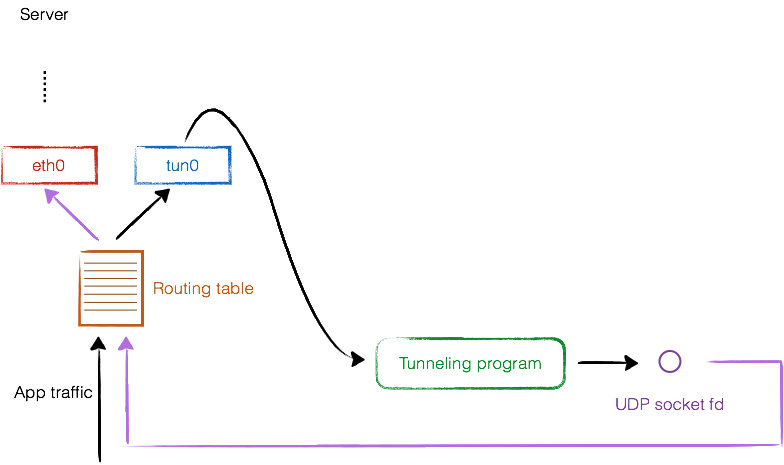
The following Linux commands route all traffic to the virtual interface, but with exception of packets with destination to VPN server, since tunneling data needs to go straight to VPN server through normal network interfaces. So the above illustration is inaccurate, it should be like this:

void setup_route_table() {
  run("sysctl -w net.ipv4.ip_forward=1");
  run("iptables -t nat -A POSTROUTING -o tun0 -j MASQUERADE");
  run("iptables -I FORWARD 1 -i tun0 -m state --state RELATED,ESTABLISHED -j ACCEPT");
  run("iptables -I FORWARD 1 -o tun0 -j ACCEPT");
  char cmd[1024];
  snprintf(cmd, sizeof(cmd), "ip route add %s via $(ip route show 0/0 | sed -e 's/.* via \([^ ]*\).*/\1/')", SERVER_HOST);
  run(cmd);
  run("ip route add 0/1 dev tun0");
  run("ip route add 128/1 dev tun0");
}
The following code snippet is the core packet switch algorithm. It reads packets from tun device, encrypt, send UDP socket; And read from UDP socket, decrypt, write to tun device. I used select multiplexing to monitor on these 2 fds.
char tun_buf[MTU], udp_buf[MTU];
  bzero(tun_buf, MTU);
  bzero(udp_buf, MTU);

  while (1) {
    fd_set readset;
    FD_ZERO(&readset);
    FD_SET(tun_fd, &readset);
    FD_SET(udp_fd, &readset);
    int max_fd = max(tun_fd, udp_fd) + 1;

    if (-1 == select(max_fd, &readset, NULL, NULL, NULL)) {
      perror("select error");
      break;
    }

    int r;
    if (FD_ISSET(tun_fd, &readset)) {
      r = read(tun_fd, tun_buf, MTU);
      if (r < 0) {
        perror("read from tun_fd error");
        break;
      }

      encrypt(tun_buf, udp_buf, r);

      r = sendto(udp_fd, udp_buf, r, 0, (const struct sockaddr *)&client_addr, client_addrlen);
      if (r < 0) {
        perror("sendto udp_fd error");
        break;
      }
    }

    if (FD_ISSET(udp_fd, &readset)) {
      r = recvfrom(udp_fd, udp_buf, MTU, 0, (struct sockaddr *)&client_addr, &client_addrlen);
      if (r < 0) {
        perror("recvfrom udp_fd error");
        break;
      }

      decrypt(udp_buf, tun_buf, r);

      r = write(tun_fd, tun_buf, r);
      if (r < 0) {
        perror("write tun_fd error");
        break;
      }
    }
  }
As a simple Point-to-Point VPN tunnel, server side code is almost identical to the client side since the core packet switch logic is the same. The complete code for both server side and client side is here. And iOS demo written in Swift 3 is here.